The blog is a collection of destination wedding and elopement highlights sharing your beautiful stories. It also includes wedding planning tips and inspiration.
Weddings
elopements
couples
Portraits
bride tips
Get Inspired
destination and Jackson hole wedding photography
Getting Started in Lightroom Mobile
Getting Started in Lightroom Mobile
Here are some step by step basics to getting started in Lightroom Mobile. This amazing editing software allows it’s users to add Janelle & Co Presets to their photos and take them to the next level. But more than just a filter, users can tweak their photos using the adjustments panel. You’ll need to download the FREE Adobe Lightroom Mobile App.
1. Open the Lightroom Mobile App
Open the Lightroom Mobile App on your phone and login using existing credentials, or create a new account.
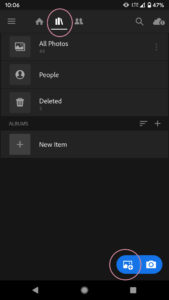
2. Add Your Personal Photos into the App
Click on the “Library” button that looks like a stack of books. This will open your folders and files.
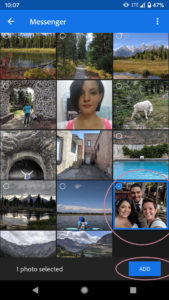
Add Photos by clicking on the blue picture plus symbol in the bottom left corner.
Select photos from your camera roll and then hit the “Add” button.
3. Open Photos for Editing
In the “Library” folder, click “All Photos”, then select the photo you want to edit. It will open and allow you to start editing!
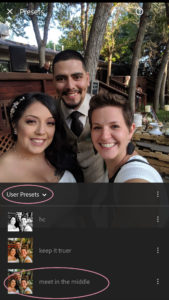
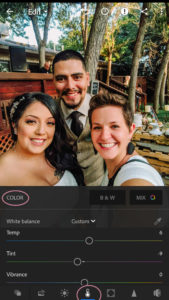
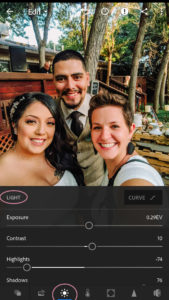
4. Edit Your Photo
Use the bottom toolbar to edit your photo, adding presets, adjusting light, color, crop, etc. More help the resource blog post “How to Apply Basic Edits in Lightroom Mobile”.
5. Export Your Edited Photos
The app will save your edit progress, but in order to post them online or share them, you’ll need to export your edited photo.
Click the “Share” button in the upper right hand corner.
Choose “Save to Device” to save your edited photo to your phone’s camera roll.
For more options, you can also choose “Export…” to make additional size and quality adjustments.

You just edited your first photo! Wohoo!! For more resources, check out:
Etsy shop for our popular MOBILE PRESETS.
How to Install Lightroom Mobile Presets
How to Apply Basic Edits in Lightroom Mobile